Gooey Marshmallow Brownies- Irresistible Fudgy Treat
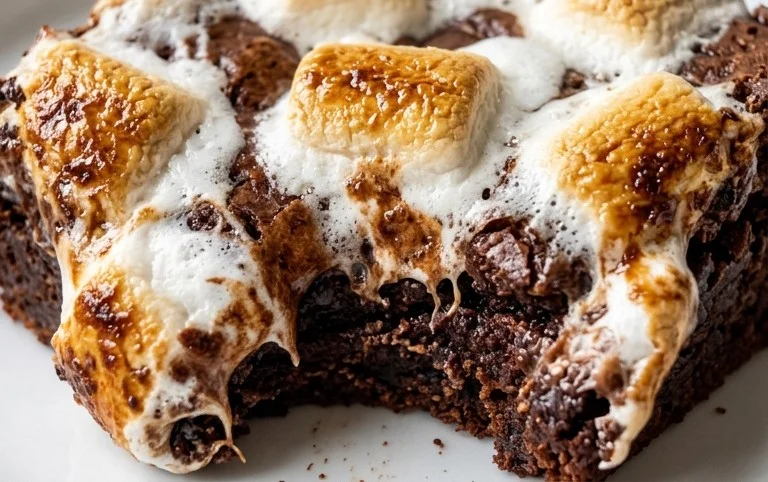
Marshmallow Brownies are an absolute game-changer for any dessert lover. There’s a reason these fudgy, gooey delights hold such a special place in our hearts and on our dessert tables. Imagine biting into a rich, intensely chocolatey brownie, only to discover pockets of molten, airy marshmallow interspersed throughout. It’s that perfect contrast of textures and flavors – the deep cocoa richness meeting the sweet, pillowy cloud – that makes Marshmallow Brownies so utterly irresistible. Whether you’re a seasoned baker looking for a crowd-pleasing treat or a beginner seeking a foolproof way to impress, these Marshmallow Brownies deliver on every single promise. They’re more than just a dessert; they’re a hug in brownie form, a guaranteed smile-inducer, and the ultimate indulgence for any chocolate and marshmallow aficionado.

Heavenly Marshmallow Brownies: A Decadent Dream
Prepare yourselves, dessert lovers, because today we are diving headfirst into a recipe that is guaranteed to bring pure, unadulterated joy to your taste buds: Marshmallow Brownies. These aren’t just any brownies; they’re a luxurious, fudgy foundation crowned with a gooey, sweet layer of toasted marshmallow goodness. Imagine the rich, deep chocolate mingling with that ethereal, melt-in-your-mouth fluff. It’s a match made in dessert heaven, and I’m so excited to share how you can create this masterpiece in your own kitchen. This recipe strikes the perfect balance between intense chocolate flavor and that irresistible marshmallow magic, making it a crowd-pleaser for any occasion. Whether you’re baking for a party, a cozy night in, or simply treating yourself, these brownies are sure to impress.
Ingredients:
- 2 cups White granulated sugar
- 3 Large eggs
- 1 Egg yolk
- 1/2 cup Unsalted butter (melted)
- 2 tsp Pure vanilla extract
- 1/2 cup Oil (canola or vegetable)
- 3/4 cup All-purpose flour
- 1 cup Unsweetened cocoa powder (Use dutch process cocoa powder for a richer, smoother flavor)
- 1 1/2 TBSP Cornstarch
- 1/2 tsp Salt
- 1 cup Semi-sweet chocolate chips
- 1 cup Marshmallow creme
Baking the Perfect Brownie Base
The journey to these incredible Marshmallow Brownies begins with crafting the perfect brownie base. We’re aiming for something fudgy, rich, and intensely chocolatey – a canvas that will beautifully complement the sweet marshmallow topping. Don’t rush this stage; the care you put in here will absolutely pay off in the final product.
- Preheat your oven and prepare your pan: Before we get our hands dirty with batter, let’s get our oven ready. Preheat it to 350°F (175°C). This consistent temperature is crucial for even baking. Next, prepare a 9×13 inch baking pan. I like to grease it thoroughly with butter or non-stick cooking spray, and then line it with parchment paper, leaving an overhang on the sides. This overhang acts as a helpful “sling” to lift the baked brownies out of the pan cleanly, making slicing a breeze. Trust me, struggling to cut brownies in the pan is a frustration you don’t need.
- Combine wet ingredients and sugar: In a large mixing bowl, whisk together the 2 cups of granulated sugar, 3 large eggs, and 1 egg yolk. Whisk until the mixture is smooth and slightly lighter in color. This step incorporates air into the batter, which contributes to the fudgy texture. Now, pour in the 1/2 cup of melted unsalted butter and the 1/2 cup of oil. The combination of butter and oil creates a wonderfully moist and tender brownie. Add the 2 teaspoons of pure vanilla extract for that essential warm aroma and flavor. Whisk everything together until well combined. You should have a glossy, homogenous mixture.
- Incorporate dry ingredients: In a separate medium bowl, whisk together the 3/4 cup of all-purpose flour, 1 cup of unsweetened cocoa powder (definitely use Dutch process for its deeper, less bitter flavor), the 1 1/2 tablespoons of cornstarch, and the 1/2 teaspoon of salt. The cornstarch helps to create a tender crumb and prevent the brownies from becoming too cakey. Sift these dry ingredients into the wet ingredient mixture. Gently fold them in with a spatula until just combined. Be careful not to overmix at this stage; overmixing can develop the gluten in the flour, resulting in tougher brownies. A few streaks of flour remaining are perfectly acceptable.
- Add chocolate chips and bake: Now for the little bursts of chocolatey goodness! Stir in the 1 cup of semi-sweet chocolate chips. These will melt slightly during baking, adding another layer of richness and texture to your brownies. Pour the thick batter into your prepared baking pan and spread it evenly. Now, it’s time to bake! Place the pan in your preheated oven and bake for 25-30 minutes. You’ll know they’re ready when a toothpick inserted into the center comes out with moist crumbs attached, but not wet batter. We’re aiming for fudgy, not dry and overbaked.
The Marshmallow Magic
Once your brownie base is out of the oven, it’s time for the show-stopping marshmallow layer. This is where the magic truly happens and elevates these from great brownies to unforgettable treats.
- Apply the marshmallow creme: While the brownies are still warm in the pan, immediately spread the 1 cup of marshmallow creme evenly over the top. It’s important to do this while the brownies are warm so the marshmallow creme spreads more easily and begins to melt slightly into the warm brownie. Don’t worry if it’s not perfectly smooth; a slightly rustic look is part of its charm.
- Toast to perfection: This is the crucial step for that toasted marshmallow flavor and appearance. You have two options here:
- Broiler Method: If you have a broiler, carefully place the pan under the broiler for 1-2 minutes. Keep a VERY close eye on it, as it can go from perfectly golden to burnt in seconds! You want the marshmallow creme to puff up and turn a beautiful golden brown.
- Oven Method: Alternatively, you can return the pan to the oven for another 5-7 minutes at 350°F (175°C), or until the marshmallow creme is golden and slightly bubbly. Again, watch it closely to prevent burning.
Whichever method you choose, the aroma that will fill your kitchen at this point is simply divine.
- Cool and slice: This is arguably the hardest part – waiting! Let the brownies cool completely in the pan on a wire rack. This allows them to set properly, ensuring clean slices and preventing the marshmallow from becoming too gooey and messy. Once completely cooled, use the parchment paper overhang to lift the entire brownie slab out of the pan. Now, you can slice them into squares. For the cleanest cuts, use a sharp knife, and wipe the knife clean between each slice.
Enjoy these heavenly Marshmallow Brownies with a glass of milk, a cup of coffee, or simply on their own. They are rich, decadent, and utterly irresistible!
Conclusion:
So there you have it – your ultimate guide to creating the most decadent and delightful Marshmallow Brownies! This recipe truly delivers a perfect balance of rich, fudgy brownie and gooey, toasted marshmallow. It’s a crowd-pleaser for a reason, offering a comforting, nostalgic treat with an irresistible textural contrast. Whether you’re a seasoned baker or just starting out, these Marshmallow Brownies are incredibly rewarding and surprisingly simple to whip up.
Serving these warm is an absolute must; the melting marshmallow is pure magic. They are fantastic on their own, but for an extra indulgence, try them à la mode with a scoop of vanilla bean ice cream or a drizzle of warm chocolate ganache. For variations, feel free to add chocolate chips to the batter for even more chocolatey goodness, or sprinkle a pinch of sea salt on top before baking to enhance the flavors.
I truly encourage you to give these Marshmallow Brownies a try. They are guaranteed to become a favorite in your baking repertoire. Don’t be intimidated by the steps; the result is so worth it!
Frequently Asked Questions:
Why are my marshmallows not toasting properly on top?
Ensure your oven rack is positioned in the upper third of your oven. You can also turn on your broiler for the last minute or two of baking, watching very carefully to prevent burning. Make sure the marshmallows are spread in a single layer for even toasting.
Can I make these Marshmallow Brownies ahead of time?
Yes, you can bake the brownies and let them cool completely. Store them in an airtight container at room temperature for up to 2-3 days. When you’re ready to serve, you can gently warm them in the oven for a few minutes before topping with marshmallows and toasting. The marshmallow topping is best added closer to serving time for optimal gooeyness.
Marshmallow Brownies
Fudgy brownies swirled with gooey marshmallow creme for an irresistible treat.
Ingredients
-
2 cups White granulated sugar
-
3 Large eggs
-
1 Egg yolk
-
1/2 cup Unsalted butter (melted)
-
2 tsp Pure vanilla extract
-
1/2 cup Oil (canola or vegetable)
-
3/4 cup All-purpose flour
-
1 cup Unsweetened cocoa powder (Use dutch process cocoa powder)
-
1 1/2 TBSP Cornstarch
-
1/2 tsp Salt
-
1 cup Semi-sweet chocolate chips
-
1 cup Marshmallow creme
Instructions
-
Step 1
Preheat oven to 350°F (175°C). Grease and flour a 9×13 inch baking pan. -
Step 2
In a large bowl, whisk together the granulated sugar, eggs, and egg yolk until well combined. -
Step 3
Stir in the melted butter, vanilla extract, and oil until smooth. -
Step 4
In a separate bowl, whisk together the flour, cocoa powder, cornstarch, and salt. -
Step 5
Gradually add the dry ingredients to the wet ingredients, mixing until just combined. Do not overmix. -
Step 6
Fold in the semi-sweet chocolate chips. -
Step 7
Pour half of the batter into the prepared pan. Dollop spoonfuls of marshmallow creme over the batter, then carefully spread the remaining batter over the marshmallow creme. -
Step 8
Bake for 30-35 minutes, or until a toothpick inserted into the center comes out with moist crumbs attached. -
Step 9
Let cool completely in the pan before cutting into squares.
Important Information
Nutrition Facts (Per Serving)
It is important to consider this information as approximate and not to use it as definitive health advice.
Allergy Information
Please check ingredients for potential allergens and consult a health professional if in doubt.


